
In this generation of technology, video editing with Canva has made it easier than ever to create professional-quality videos without expensive software or equipment. To edit video using Canva, you don’t need an expensive camera or software to create professional-quality videos for your Facebook or YouTube content. You can easily edit professional videos using the Canva app on a normal smartphone. Whether you’re a content creator, business owner, or just someone who loves making videos for your social media. This easy-to-follow guide will teach you how to use Canva’s video editing features to add text, animations, effects, and more. You do not need to be a professional video editor, but you need a focus, knowledge, and a passion for learning. So, in today’s tutorial, I will share with you how to edit high-quality professional-level videos using the Canva app on a normal smartphone. Without further delay, let’s get started with the practical steps.
How to Get started with Video Editing with Canva
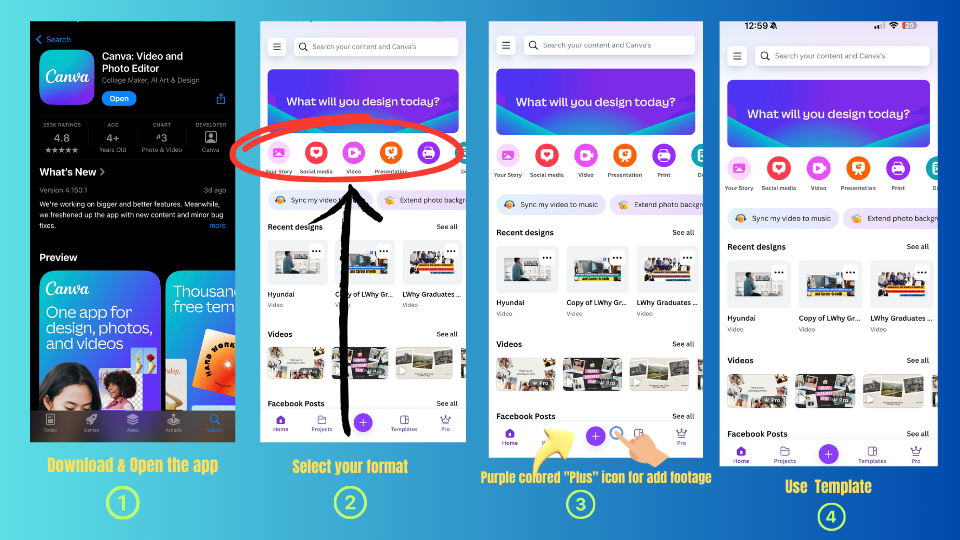
Step 1: First, go to the App Store and search for “Canva.” After you search for it, please download and install the app.
Step 2: Open the Canva app, and you will see a dashboard with a Video option. Here, you can select any format you want for your video project, such as landscape, vertical, Facebook, Instagram Reels, and more. Choose it according to your need.
Step 3: You can either choose a blank canvas or use one of the many pre-designed templates available in the app. Today, let’s start from scratch with a blank canvas.
Step 4: Now, you need to add your video footage.
- Tap on the purple colored “Plus” icon to add your video footage.
- Scroll down to find multiple options, then click on Uploads.
- Next, tap Upload Files => Choose File from your device => and select the video you want to use for your project.
Once your selected video is added, you can scroll down using your finger to preview it.
Step 5: Now, tap on the video on the screen to resize it.
- To set the video as the full background, tap it and hold the video.
- You will see several options appear at the bottom of the screen.
- Scroll to the left and tap on “Set as Background.”
- That’s it! Your video is now set as the background.
Next, you have to move forward. Scroll it and click on the Plus (+) button to add another video clip for your project. You have to repeat this process for each video clip you want to add.
Alright! Now that all our video clips are added, if you want to rearrange the clips or change their order, follow the tips carefully.
Step 6: Simply hold the project and drag the video clips at the bottom of the screen.
Step 7: Slide the video into your preferred order using your finger, so that way you want.
Now, you need to know how to trim your video clips, which is very important.
To do this, please follow the instructions below:
- Tap on the video clip you want to trim.
- Then, press and hold the small arrow icon with your finger to cut out any unnecessary parts of the video.
- You can also trim the end portion of the video if needed. You can trim the video wherever you want. This is the fun part of the Canva app.
Many people prefer using the split tool for trimming. To do that:
- First, scroll through the video to find the exact spot where you want to cut.
- Then, tap on the Split button, and your video will be split into two clips.
- You can now delete the unwanted portion of the video easily.
If you want to cut/split a specific section from the middle of the video, you can do that too!
And you do not need to worry if you make a mistake while editing. You can make a simple fix!
- At the top left corner of the screen, you will see a backward-facing arrow.
- Just tap on it, and it will undo your last action, it means you can go back to fix it. So simple, right?
When you select a video clip and scroll down, you’ll see many options like Adjustments, Effects, Filters, Volume, and more. This option is incredibly useful to make your videos more attractive.
How to Use Elements in the video
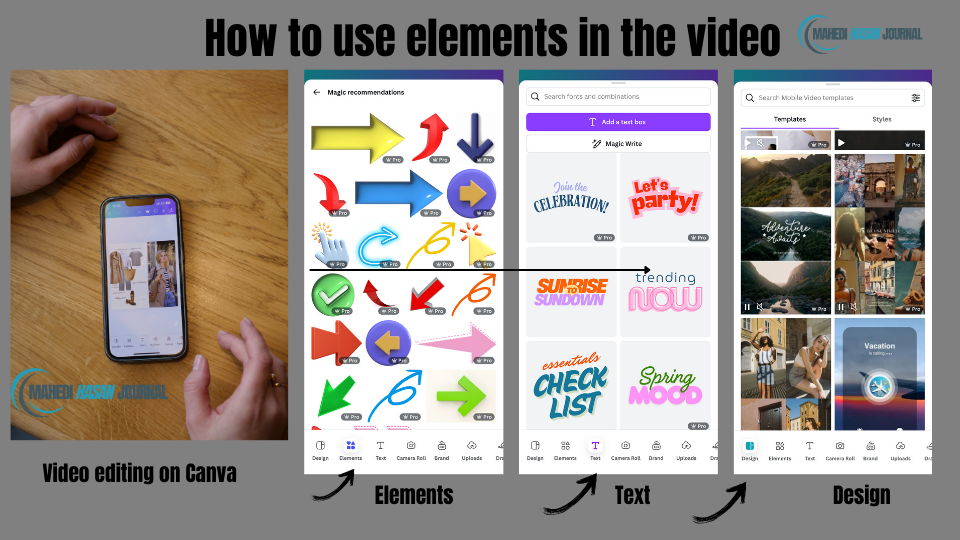
Now, let’s learn how to add elements to our video.
After selecting your video clip:
- Tap on the Purple “Plus” (+) icon again.
- This will take you back to the regular canvas section where you find options for elements.
You need to know what the options are for?
- Design – Contains various templates you can use.
- Elements – Includes stickers and graphics that you can add based on your video’s needs.
- Text Section – Allows you to add captions and descriptions to your video.
One of the best features of Canva is its graphical text templates.
- You can add any text template you like,
- Then rename and resize the text according to your preference.
- You can also control how long the text will appear in your video by splitting the video at the desired moment.
Additionally, you can customize text or graphics by adding animation effects. I like this feature as it improves video engagement to the viewers.
- To do this, select the text on the video screen
- Scroll through the bottom options and tap “Animate”
- Choose your preferred style: for example, Bounce, Burst, Roll, Skate, or whichever effect best suits your video.
Best Templates for Video Engagement
Templates are pre-made free video layouts that make editing super easy. You can adjust the graphics to fit your style.
To use a template:
- Click on the Purple “Plus” (+) icon again
- Go to the Design section
- Browse through various template options
If you select a template and play it, you’ll see a preview.
- You can edit the text section
- Improve the graphical design
- Customize the layout, colors, and design to match your vision
You can even use a template as your video background and then add your video clips to create a final project.
Exporting and Downloading Your Final Video in Canva
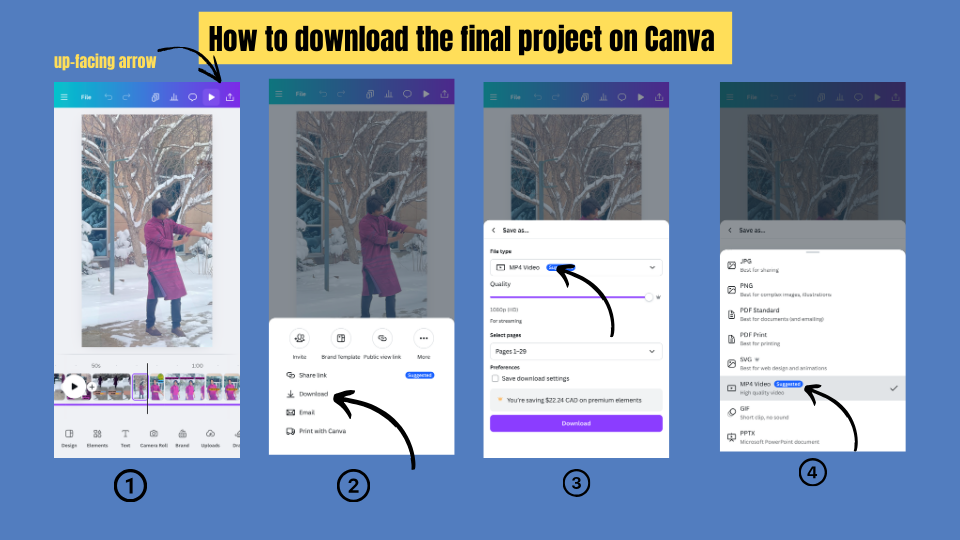
After you finish your editing, you need to download your final video.
To do so:
- In the top right corner of the screen, you will see an up-facing arrow. You need to tap it.
- You will see a couple of options including the Download option.
- Select the file type for the video format you need.
- Then, download it. Your long-awaited video is ready to upload on Facebook, Instagram, or YouTube.
With video editing in Canva, you can easily transform your graphical ideas into professional-quality videos. From trimming clips to adding text and animations, everything is simple and beginner-friendly. Now that you know the basics, start experimenting and bring your creative vision to life. Whenever you capture your beautiful moments during the vacations or parties, you can easily edit your videos using Canva and share it with yours= friend on Social Media.
Thank you for visiting my page, and showing your interest in learning technical skills.
FAQs
1. Is Canva good for video editing?
Yes! Video editing with Canva is perfect for beginners and professionals alike. Because it offers easy-to-use tools for trimming, adding text, animations, and effects. You can expect many features in this tools without needing advanced editing skills.
2. Can I use Canva for free to edit videos?
Yes, Canva offers a free version with basic video editing features. However, some premium templates, elements, animations, and effects require a Canva Pro subscription with a specific amount of charge. Canva offers monthly and yearly subscription.
3. What is the best format to download my video from Canva?
For high-quality results, download your video in MP4 format. Canva also provides options to adjust resolution and quality before exporting your final video.
I highly recommend ernestopro.com for all your video editing needs. Their platform offers intuitive tools that perfectly complement Canva’s features, making the editing process seamless for beginners and pros alike. Whether you’re creating engaging content or professional videos, ernestopro.com provides excellent support and innovative solutions. I’ve found their services to be reliable and user-friendly, which has significantly improved my workflow. Don’t hesitate to explore ernestopro.com to elevate your video projects efficiently and creatively.